How can I find and repair an air leak in my inflatable water craft?

It can be very frustrating to have a soft inflatable river raft during an outing or expedition. Laying out the steps necessary for a find, fix and repair are fairly simple and straightforward. The very first thing you need to do is locate the leak. That is the tricky part, where is the air leaking from. Many times the valves are the problem, as corrosion and dirt build-up and cause the material to pull away from the valve housing. Often tiny punctures happen along the seams as well as the surface of the body of the inflatable boat. The trick here is to be patient, as this might take some time.
Preparation
can really make life simple. Mix together a small amount of liquid soap
(dish washing or clothes detergent) with water in an old spray bottle. Be sure
to make sure whatever was in the spray bottle previously isn’t corrosive.
Purchasing a clean spray bottle might be an ideal way to always have the soapy
spray on board and handy.
The
next step is to spray areas that may be leaking air. Start with the valves, as this type of slow
leak is often time the result of faulty seals. Once you have checked the valves
carefully, spray the area all around the valve and wait. The leak may be tiny
and hard to spot. Watch for little bubbles coming to the surface and bursting.
Once you have ruled out the valves, go for the rings, handles and eyelets all
around the inflatable dingy. Anywhere a seam is located, or there is an overlap
of material can be the instigator of a tiny leak. Another culprit can be wear along the tubes
and lower sides of the tubes. Patience is needed here as this kind of abrasion
leak can be tiny and not as readily apparent as a puncture, or defective part.
Sometimes
the leak is readily apparent and those can be patched, or a part replaced. If
the seam around a part like a valve, is leaking it is best to get a
professional assessment, because precision is necessary to repair that. For a
puncture, or slow leak on the tubes, a patch can be handled simply and
effectively, by the boater.
For
Repairs to Punctures or Leaks on the Tubes of Inflatable Boats, Dinghy’s’ and
Rafts.
- 1. Inflate the boat to its maximum working pressure (according to manufacturer’s instructions).
- 2. Mark any leaks as outlined above with a marker.
- 3. For small punctures (less than an eighth or an inch) simply deflate the boat and apply a small drop of glue and let dry for 12 hours.
- 4. For larger punctures or areas of leakage, using the included repair and patch kit is warranted.
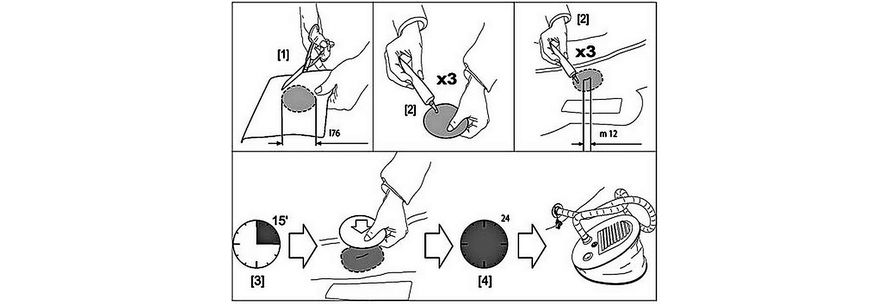
- Deflate the boat completely.
- Cut a patch to overlap approximately 1 inch all around then the punctured or worn area. Round off the corners.
- Apply glue to the surface of the boat and to the underside of the patch. Be sure to not over apply the glue as too much glue will interfere with the patch.
- Allow the bonding agent to become tacky – about 5 minutes.
- A weight of 3-5 lb. should be placed on the patched area for 24 hours.
- Finally a bead of glue should be applied to the seam around the patch and let dry for 6 hours.
If
care is taken, you can be back in the water in no time, enjoying your
inflatable boat, raft or dingy.


